How to Model a Keychain Tag with Your Phone Number in Onshape (Complete Beginner Guide)
A step by step guide to modelling a 3D keychain tag with your phone number in Onshape — from first sketch to exported STL, no CAD experience needed.
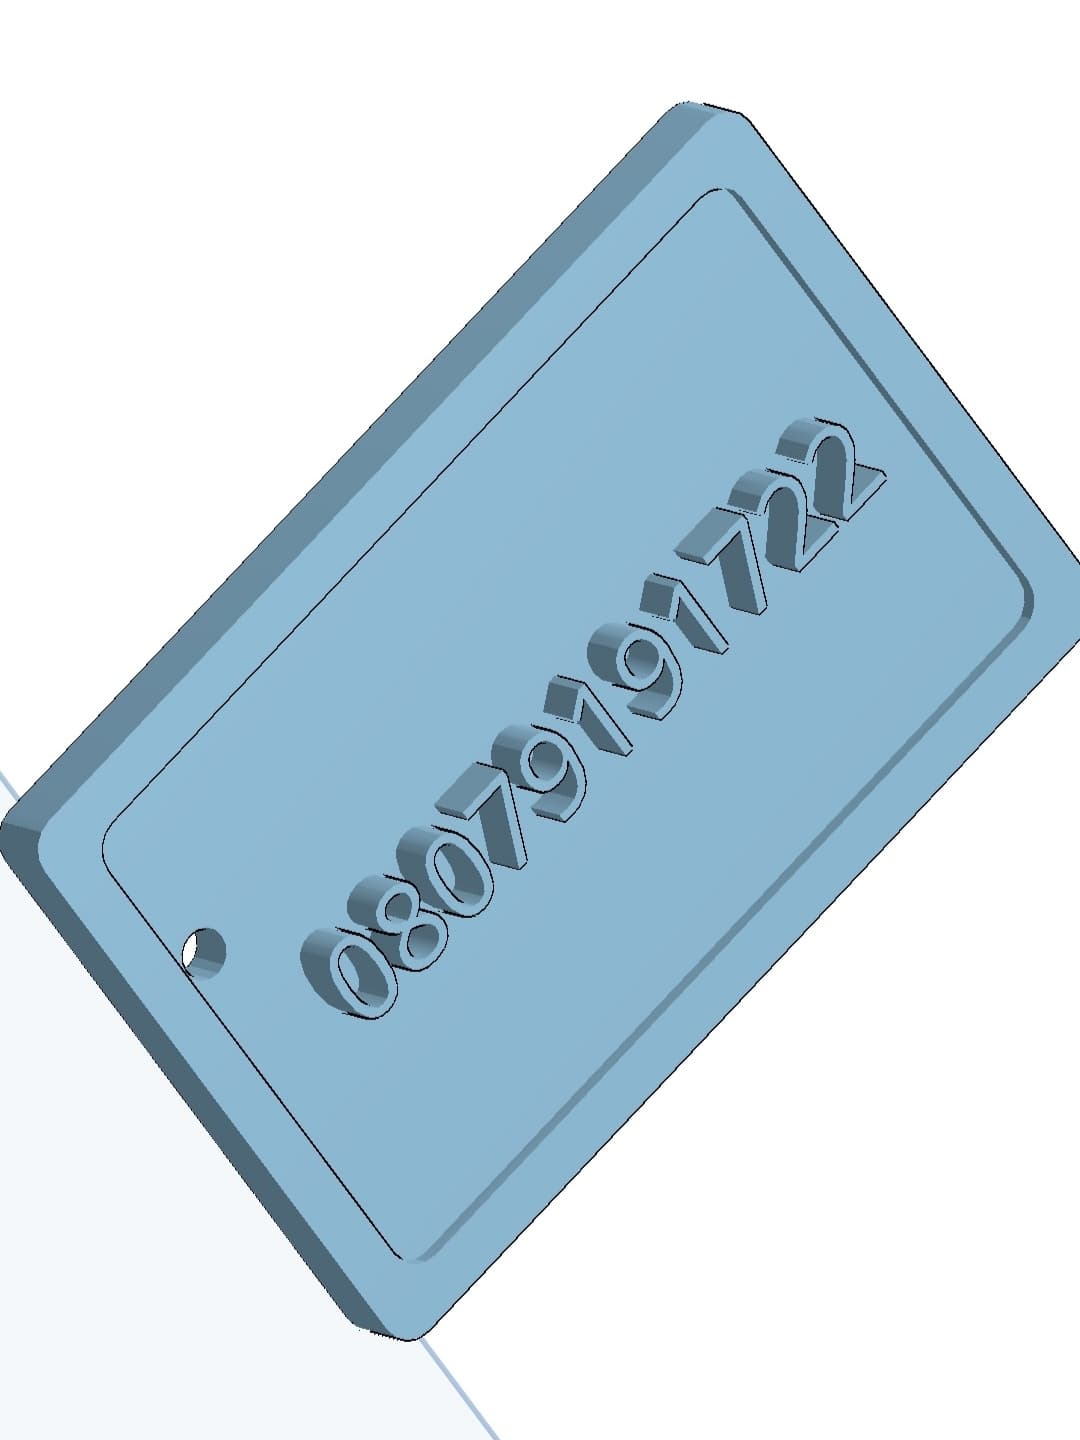
This is a full step by step guide to modelling a keychain tag in Onshape from an engineering drawing. No CAD experience needed — every click is explained. This guide is written for laptop users.
What You Need
- A laptop
- An Onshape account — sign up free at onShape, there is an education plan if you are a student
- The engineering drawing you are working from
The Part We Are Building
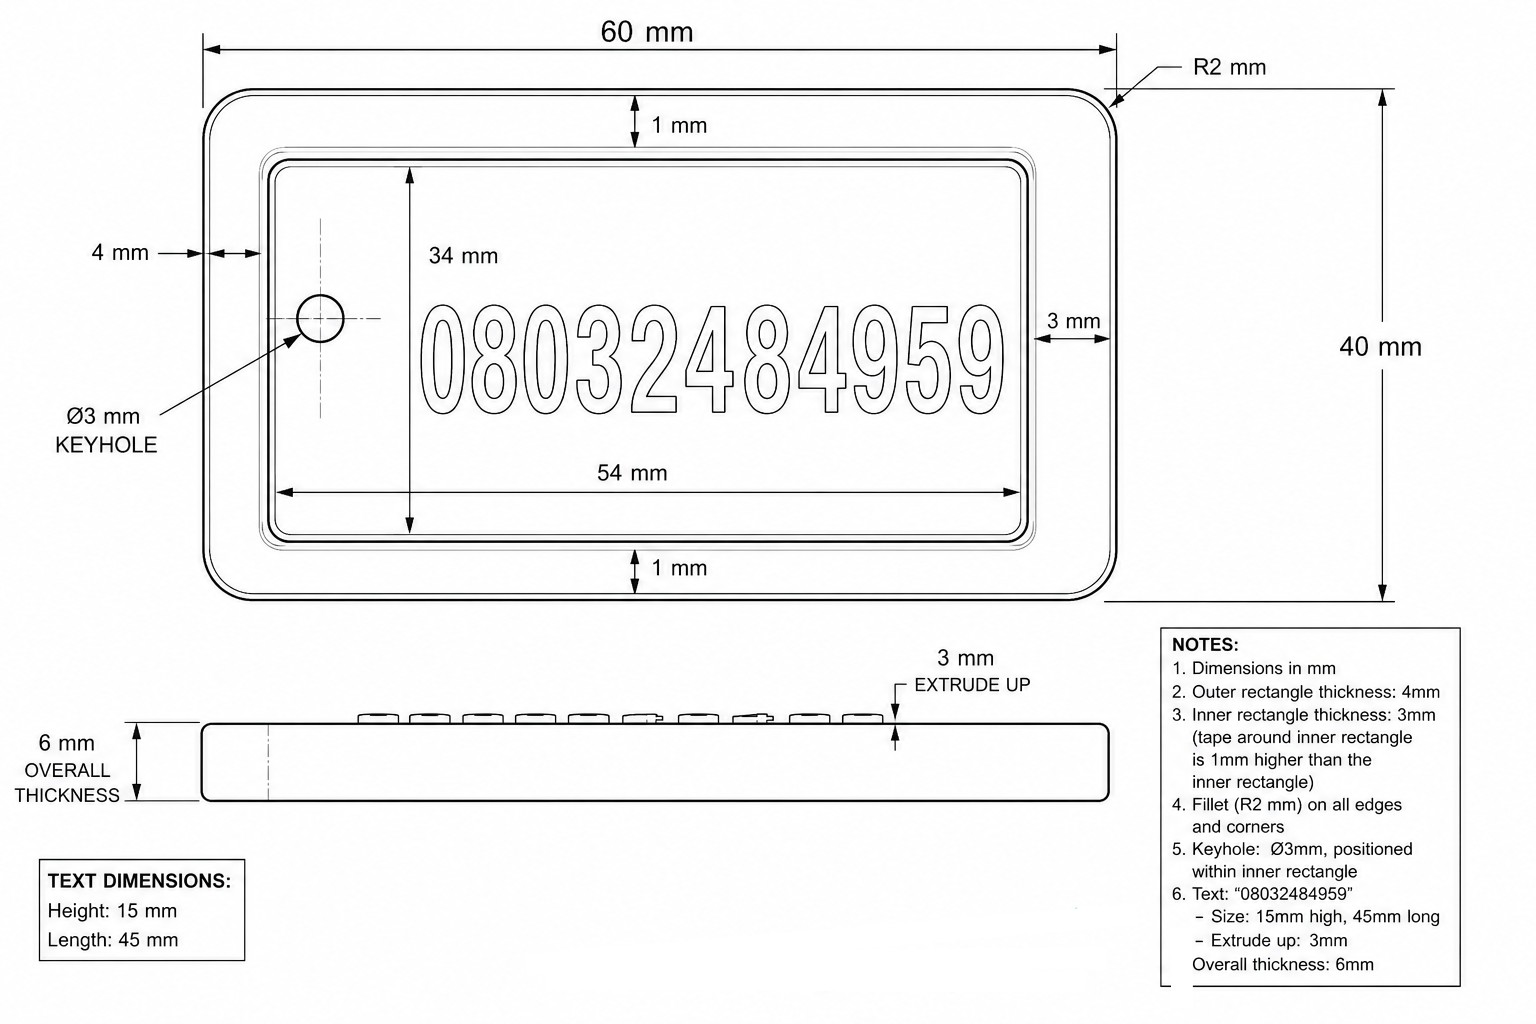
- Outer rectangle: 60×40mm, 4mm thick, R2 fillet on all edges and corners
- Inner sunken panel: 54×34mm, recessed 1mm from the outer top surface
- Tape/rim: the raised border strip around the inner panel, flush with the outer top
- Keyhole: Ø3mm hole, positioned within the inner rectangle on the left side
- Text (your phone number): extruded 3mm up from the inner panel surface
- Overall thickness: 6mm
Step 1 — Create a New Document
- Log in to Onshape at onshape.com
- Click Create on the top left of your dashboard
- Select Document, name it and confirm
- You will land inside a Part Studio — this is where all the modelling happens
Step 2 — Draw the Outer Rectangle
- At the top toolbar, click Sketch
- Onshape will ask you to select a plane — click Top Plane
- You are now inside a sketch. The toolbar at the top changes to sketch tools
- Right click on the Top Plane and select view normal to or rotate manually into view
- Click the Rectangle tool — click the small arrow next to it and select Corner Rectangle
- Click the center dot (the origin point in the middle of the workspace) to start drawing from there
- Drag outward to the top right area and click anywhere to place the rectangle — the size does not matter yet
Step 3 — Clean Up the View
Before setting dimensions, hide the origin planes so they do not clutter your workspace:
- Look at the feature list on the left sidebar
- You will see Top, Front, and Right listed there — these are origin planes
- Hover over each one and click the eye icon that appears next to it to hide them
Your workspace is now clean and easier to work with.
Step 4 — Set the Dimensions
- In the sketch toolbar at the top, click the Dimension tool
- Click the top side of your rectangle and type 60, press Enter — this sets the width
- Click the right side and type 40, press Enter — this sets the height
- Your rectangle is now exactly 60×40mm
Step 5 — Fillet the Rectangle Corners
Still inside the sketch, fillet the four corners before extruding:
- In the sketch toolbar, click the Fillet tool
- Click all 4 corners of the rectangle one by one
- Set the radius to 2mm
- Click the green checkmark inside the fillet tool to confirm
Your rectangle now has smooth R2mm rounded corners.
Step 6 — Finish the Sketch and Extrude
- Click the green checkmark to finish the sketch
- At the top toolbar, click Extrude
- Onshape will automatically select your sketch
- Set the depth to 4mm
- Click the green checkmark to confirm
You now have a solid rounded box, 60×40×4mm.
Step 7 — Draw the Inner Rectangle
- Click the top face of your box to select it
- At the top toolbar, click Sketch
- Click the Rectangle tool and select Corner Rectangle
- Click close to the bottom left corner of the outer rectangle to start from there
- Drag inward and click anywhere to place the rectangle — size does not matter yet
- Click the Dimension tool
- Click the top side of the inner rectangle then the top side of the outer rectangle, type 3, press Enter
- Click the bottom side of the inner rectangle then the bottom side of the outer rectangle, type 3, press Enter
- Click the left side of the inner rectangle then the left side of the outer rectangle, type 3, press Enter
- Click the right side of the inner rectangle then the right side of the outer rectangle, type 3, press Enter
The inner rectangle is now exactly 54×34mm with a 3mm gap on every side.
Step 8 — Fillet the Inner Rectangle Corners
Still inside the same sketch:
- In the sketch toolbar, click the Fillet tool
- Click all 4 corners of the inner rectangle one by one
- Onshape will default to R2mm since that was the last value used — confirm it and accept
- Click the green checkmark to finish the sketch
Step 9 — Extrude Remove the Inner Panel
- Click Extrude at the top toolbar
- Change the operation from Add to Remove
- Set the depth to 1mm
- Click the green checkmark
This cuts 1mm into the top of the box. You now have a 1mm raised border around the panel — that is the tape — and a sunken floor sitting at 3mm height.
Step 10 — The Keyhole
- Click the inner rectangle recessed floor — the sunken surface inside the panel
- At the top toolbar, click Sketch
- In the sketch toolbar, select the Circle tool
- Click to place the center — 6mm from the left outer side, slightly above the vertical center of the panel
- Click the Dimension tool, click the circle, and type 3 to set the diameter to 3mm
- Click the green checkmark to finish the sketch
- Click Extrude at the top toolbar
- Change the operation to Remove
- Change the depth from Blind to Through All
- Click the green checkmark
A 3mm hole now runs straight through the entire part.
Step 11 — The Text Extrusion
Onshape's text tool does not let you set width and height independently — the font controls the width automatically. Here is what works:
- Click the recessed floor
- At the top toolbar, click Sketch
- In the sketch toolbar, click the Text tool
- Click somewhere in the panel to place it
- Type your phone number (use your own number)
- Click the Dimension tool, click the text, and set the width to 45mm — let Onshape calculate the height, it will come out around 5mm
- Now position the text — click the right side of the text then the right side of the inner rectangle, type 2.5, press Enter
- Click the top side of the text then the top side of the inner rectangle, type 14.4, press Enter
- Click the green checkmark to finish the sketch
- Click Extrude at the top toolbar
- Make sure the operation is set to Add
- Set the depth to 3mm
- Click the green checkmark
The text sits 3mm above the inner floor. Inner floor is at 3mm, text top is at 6mm — that is your overall thickness.
Step 12 — Verify Your Dimensions
Before exporting, confirm everything matches your drawing:
- Overall thickness = 6mm ✓
- Outer body = 60×40mm ✓
- Inner panel = 54×34mm ✓
- Border gap = 3mm on all sides ✓
- Keyhole = Ø3mm, through all ✓
- Text extruded 3mm up ✓
Use the view cube in the top right to rotate and inspect from all angles.
Step 13 — Export as STL
- In the feature list on the left sidebar, right-click your part
- Click Export
- Select STL as the format
- Click Export and it downloads to your computer
Things That Will Trip You Up
Sketch could not be solved — you have a conflicting dimension somewhere. Delete the conflicting one and re-enter it.
Text width does not match — you cannot force a specific width on Onshape text. Adjust height until the width fits the panel cleanly.
Extrude going the wrong direction — cancel, make sure you clicked the correct face, and try again.
Planes still showing — go to the feature list and hide Top, Front, Right using the eye icon.
How Long Does It Take
First time with no experience — around 4 hours. Following this guide — under an hour.
Modelling in Onshape.
Follow NAMTES